

Article: Expert Guide to Choosing the Right Stacy Lash Tweezers for Eyelash Extensions
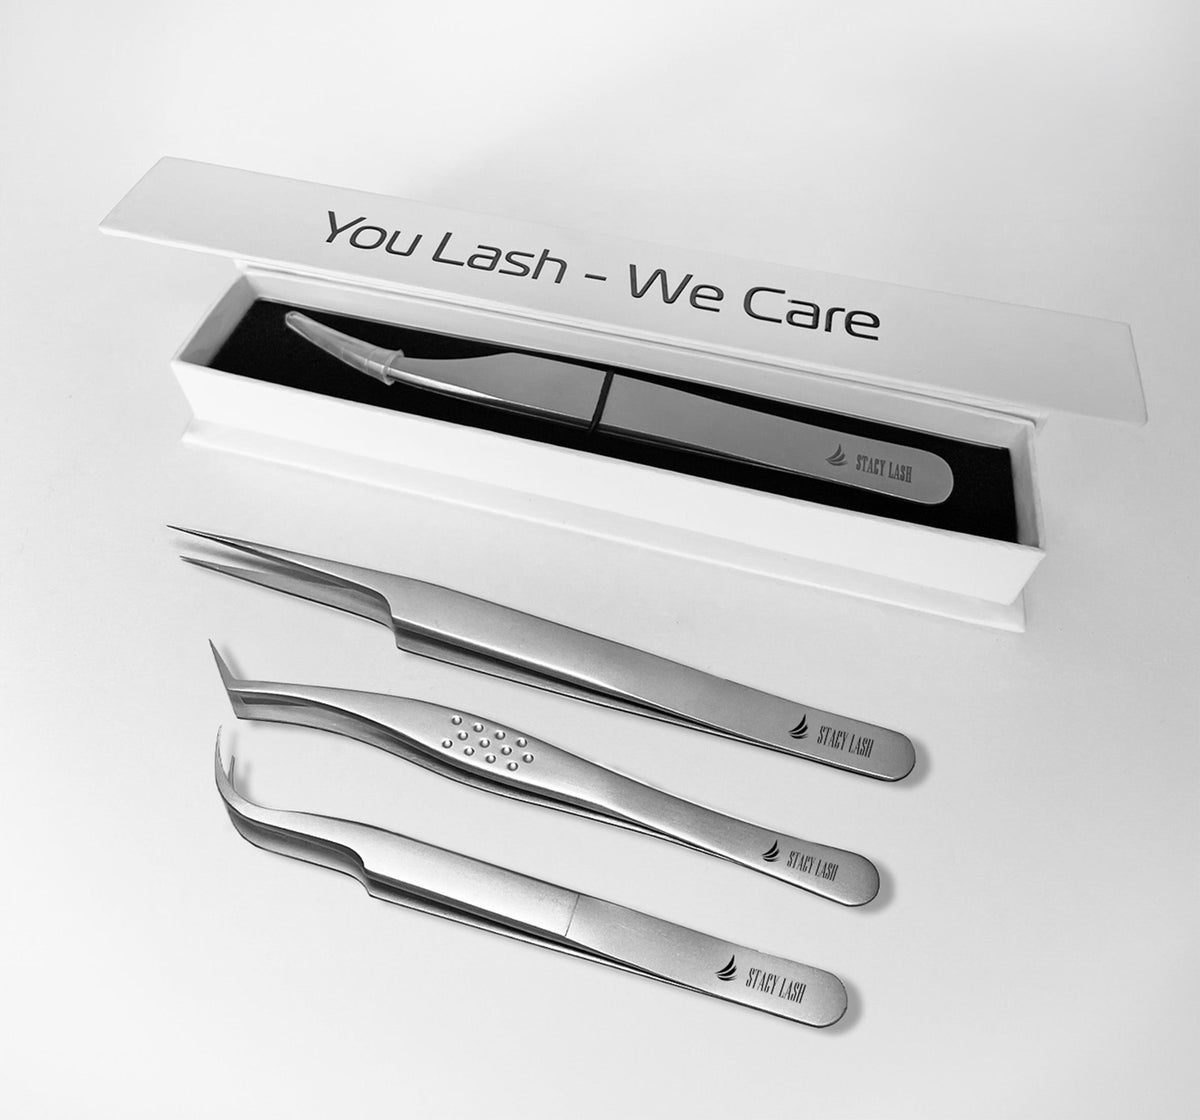
Expert Guide to Choosing the Right Stacy Lash Tweezers for Eyelash Extensions
Lash artists can spend hours choosing the perfect curl, debating lash mapping, and comparing tweezers types, cause there’s no room for error.
Your lash tweezers are doing some seriously important work. Nobody's handing them an Oscar, but everything would fall apart without them. The wrong pair can turn everything into disaster. While the right one take you to the highest heights. It’s not a place to settle for less, so maybe it’s time to look closely at your tool?
Classic Lashing or Volume Fanning?
Before we get into shapes and tiny details that can make a difference, let's start with one question: What are you actually asking your tweezers to do?
Classic application and volume fanning have different demands. And while some tweezers can multitask, not every pair will feel equally comfortable for every technique.
Classic lashing: precision is the whole point
With classic extensions, you're generally picking up one extension at a time and attaching it to an isolated natural lash. You need a reliable grip, controlled movement, and tips that meet cleanly enough to hold a single extension without sending it flying across your workstation.
A straight or appropriately curved pair may work beautifully, depending on how you hold your tweezers and approach the lash line. The key is control. You want to pick up an extension, position it, and release it without having to wrestle the tool into submission.
If you're constantly readjusting your grip or struggling to pick up individual lashes, don't automatically assume you need more practice. Technique matters, absolutely, but your tool deserves a spot in the investigation.
Volume lashing: welcome to the fan club
Volume is a different beast. You're picking up multiple fine extensions and arranging them into a fan with a base that can be placed accurately onto the natural lash. Depending on your method, you're also creating fans directly from a strip, using techniques such as pinching or rolling, or picking up premade fans.
This calls for volume tweezers with tips and tension that suit your preferred fanning method. Some artists love an L-shaped tip because it offers a defined working edge and can make creating fans feel intuitive. Others prefer a curved or S-shaped design. There's no universal winner here; the right choice depends on the fan technique, lash thickness, and the way the tweezer closes in your hand.
Isolation vs. Volume, Boot vs. Ergonomic Tweezers
The names can get confusing, especially when different brands use slightly different labels for similar shapes. So rather than getting lost in the alphabet soup, let's talk about what the tips actually help you do.
Isolation tweezers for classic application
Isolation tweezers are designed to separate natural lashes so you can work on one lash without accidentally bonding it to its neighbors.
Straight I-shaped tweezers can be a good fit for artists who like a direct approach. C-shaped and F-shaped designs offer different angles for reaching natural lashes, including those tricky corners where lashes seem determined to hide from you.
Stacy Lash offers isolation options in several shapes, including I-, C-, F-, and A-shaped designs. The shape you choose affects your approach and visibility, but the goal stays the same. Here's a little test. When you isolate a lash, can you see what you're doing without twisting your wrist?
Can you maintain separation without excessive pressure? Can you reach the inner and outer corners comfortably?
If the answer is yes, you're on the right track. If not, try a different shape before deciding your hands have personally betrayed you.
Volume and boot tweezers for handmade fans
Boot tweezers have an angled tip that can offer a useful pickup surface for creating volume fans. The precise angle and width vary by design, so two pairs labeled “boot” won't necessarily behave identically.
Some artists prefer a pronounced angle for pinching or rolling fans. Others need a narrower tip for smaller fans or a more open tip for their preferred pickup method. And that brings us to the million-dollar question: What makes the best tweezers for volume fans?
Not the label. Not the hype. Not the fact that your favorite educator has them in every single video. It's the combination of tip alignment, tension, grip, and your technique.
The tips should meet in a way that holds the extensions securely without requiring you to crush them together. You should be able to pick up the lashes, form the fan, and release it without the whole thing collapsing like a house of cards.
If you create 2D–8D fans, look for a pair that can reliably handle the fan sizes and lash diameters you use most often. A pair that works beautifully for one fan-making method may feel awkward for another.
And don't forget the release. A tweezer that picks up a fan beautifully but refuses to let go at the right moment is giving you half a solution. We need the whole package, babe.
Ergonomic Z-curve tweezers for wrist strain
Now, let's talk about comfort, because your hands are not disposable equipment.
Ergonomic designs aim to make tool handling more comfortable by changing the shape, grip, or angle of the instrument. An angled design, including certain S- or Z-curve styles, may help some artists reach the lash line without holding their wrist in the same position as they would with a straight tool.
But there's a very important distinction here: ergonomic doesn't mean pain-proof. A tweezer with a comfortable angle may reduce awkward positioning for one artist and feel completely wrong to another. Hand size, grip habits, working height, chair position, and how much pressure you apply all play a part.
If you experience wrist discomfort, consider whether you're working with a relaxed grip, whether your client is positioned at a comfortable height, and whether you're holding your arm and wrist in a strained position for long stretches.
Take breaks where possible. If pain persists, worsens, or affects everyday activities, seek advice from a qualified healthcare professional. A different pair of tweezers may help your workflow, but it isn't a substitute for addressing ongoing pain.
Finding the "Sweet Spot": How to Test Grip Before Buying
Don't judge tweezers by their appearance alone. Test how they behave. A gorgeous pair with a fancy finish can still be not enough if the tips don't align properly or the tension doesn't suit your hands.
Here are the things worth checking.
1. Tip alignment
Close the tweezers and look closely at the tips. Do they meet evenly? Is there a visible gap? Does one side slide past the other? Good alignment helps you grip extensions consistently. If the tips don't meet properly, you may struggle to pick up fine lashes or hold fans securely.
2. Tension
Open and close the tweezers several times. Do they require excessive force? Are they so loose that you struggle to maintain control? Can you close them smoothly without squeezing harder than necessary? The ideal tension is personal, but you shouldn't have to fight the tool to get a reliable grip.
3. Grip and balance
Hold the tweezers as you normally would during an appointment. Notice the weight, balance, handle texture, and how the tool sits between your fingers. Does it feel steady? Can you maneuver it without constantly readjusting your hand?
A lightweight tool can feel easier to handle during long appointments, but lighter isn't automatically better. The balance matters just as much.
4. Your actual technique
If possible, test the tweezers using the lashes and fan sizes you work with most often. An isolation tweezer should let you separate natural lashes with control. A volume tweezer should work with your pickup and fan-making method.
Don't test a volume tweezer by picking up one extension and then declare it a flop. Give it a fair audition for the role you're hiring it to play.
5. The release
Pick up an extension or fan and release it as you would during application. Does it come away smoothly, or do you find yourself fighting the tips?
Pickup gets all the glory, but release can make or break your rhythm. If a pair passes these tests and feels natural in your hand, that's a promising sign.
Stainless Steel vs. Titanium: Durability and Autoclave Resistance
Materials matter, but the conversation gets messy when people start treating one material as the undisputed champion of all tweezer performance.
Stainless steel lash tweezers
Stainless steel is widely used for precision tools because it offers a useful combination of strength, durability, and corrosion resistance. The exact performance depends on the steel grade, construction, finish, and how the tool is maintained.
Stacy Lash's current tweezer range features stainless-steel designs, including options with hand-polished tips and different shapes for isolation and volume work.
Titanium lash tweezers
Titanium and titanium alloys are valued in various applications for properties such as low weight and corrosion resistance. But a product described as “titanium” can mean different things depending on the actual material and construction.
A titanium-colored coating doesn't necessarily mean the entire tweezer is made from titanium. Likewise, a particular color or finish doesn't tell you how precisely the tips are aligned.
If you're comparing stainless steel vs. titanium lash tweezers, check the manufacturer's specifications rather than relying on marketing language alone.
What about autoclave-safe lash tools?
Don't assume every stainless-steel or titanium tweezer is automatically suitable for autoclaving.
Autoclave compatibility depends on the tool's material, construction, and the manufacturer's instructions. If you use an autoclave as part of your sanitation protocol, verify that the specific instrument is approved for that process and follow the stated instructions.
Also, cleaning, disinfection, and sterilization aren't interchangeable terms. Follow the hygiene requirements applicable to your location and service, and use the correct process for your tools.
A corrosion-resistant tweezer is a good starting point. It is not a permission slip to ignore the care instructions.
Matte Finish and Why It Matters for Close-Up Work
Let's talk aesthetics for a second. A matte or frosted finish may offer a less slippery feel than a smooth, glossy surface for some users. Depending on the design, it can make the grip feel more secure during detailed work.
It may also produce less distracting glare than a highly reflective finish under certain lighting conditions. But don't confuse a matte finish with a guarantee of better precision. It won't fix poor tip alignment, awkward tension, or a shape that doesn't suit your technique.
If you tend to adjust your grip constantly, pay attention to the surface texture. If your tweezers feel slippery when you're working, a different finish may be worth testing. Just don't buy a pair because the color looks incredible next to your lash trays and then wonder why your fans are staging a rebellion.
Pretty tools are a bonus. Reliable performance is the main event.
Tweezers for Beginners vs. Experienced Lash Artists
There's a common misconception that beginners need basic tools and experienced artists need the fanciest options on the market.
Not quite. A beginner needs tools that make learning the fundamentals manageable. An experienced artist needs tools that support the techniques and working rhythm they've developed. Neither needs a pair that makes the job harder.
If you're just starting out
When you're figuring out how to choose lash tweezers for beginners, start with the essentials.
You'll generally want one pair suited to isolation and another suited to picking up and applying extensions. If you're learning volume, choose a volume tweezer that works with the fan-making method you're being taught.
Don't buy six shapes because you think you need to own the entire tweezer cinematic universe before your first client.
Start with a couple of well-chosen tools. Learn how they behave. Build your technique. Add more options when you understand what your current pair can't do for you.
If you've been lashing for years
You probably already know your preferences. Maybe you can make fans in your sleep. Maybe you have a favorite pair that you've guarded more fiercely than the last slice of pizza.
Still, it can be worth testing a different shape if you're struggling with a particular technique, working with different fan sizes, or feeling uncomfortable during long appointments.
Your favorite tool doesn't have to be your only tool. A versatile kit gives you options. Just make sure each pair earns its place rather than collecting dust in a drawer full of abandoned beauty purchases.
And if your tweezers start slipping, feel noticeably looser, become damaged, or no longer align properly, don't cling to them out of loyalty.
FAQ
Q: What's the difference between isolation and volume tweezers?
A: Isolation tweezers are designed to separate individual natural lashes so neighboring lashes remain distinct during application.
Volume tweezers are designed to pick up and manipulate multiple fine extensions to create or place volume fans. Their tip shapes and tension may differ depending on the fan-making method.
Some tweezers can perform more than one task, but using separate pairs suited to isolation and volume can make your workflow more predictable.
Q: Are titanium tweezers better than stainless steel?
A: Not automatically. Titanium and stainless steel have different material properties, but the best choice depends on the specific tool's construction, tip alignment, tension, weight, and your personal preference.
A well-made stainless-steel tweezer may work better for your technique than a poorly designed titanium one. Check the actual material specifications and the manufacturer's care instructions before buying.
Q: How often should I replace my lash tweezers?
A: There's no universal replacement schedule. Replace or retire a pair when the tips become damaged, bent, misaligned, or unable to grip and release lashes reliably.
Regularly inspect your tweezers, remove adhesive buildup using an appropriate method, follow the manufacturer's cleaning and disinfection instructions, and store the tips in a protective case.
If a pair starts behaving differently, don't automatically blame your hands. Check the tool first.
Your Tweezers Should Always Take Your Side
Classic artist? Prioritize isolation and a reliable single-lash grip.
Volume artist? Look for tip geometry and tension that suit your fan-making method.
Working long appointments? Pay attention to weight, balance, and how your hand feels over time.
Just starting out? Keep it simple, learn your tools, and resist the urge to buy every shiny thing that catches your eye.
And if your current tweezers are making you work twice as hard for half the result, it might be time to explore your options. Your tools should make the artistry easier.




Leave a comment
This site is protected by hCaptcha and the hCaptcha Privacy Policy and Terms of Service apply.